created 06/24/2005; revised 03/28/2007, 08/03/2012, 11/14/15
Read the sections on images and gray level images before playing with these puzzles.
Write a main() program with a command line that lists a file name,
image rows, image columns, and a gray level. Create a PGM image file of that
name with all of its pixels of that gray level. For example,
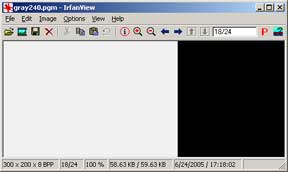
C:\PuzzleFolder>makeGray gray240.pgm 200 300 240
creates a gray level image file called gray240.pgm of size 200
rows by 300 columns with all pixels at level 240. Here is a skeleton program
that does most of the work. If you have a programming environment such
as Bloodshed Dev-C++ copy-and-paste this code into a source file.
#include <stdio.h>
#include <stdlib.h>

int main(int argc, char *argv[])
{
  int r, nrows, c, ncols, grayLevel;
  FILE *image;

  /* check the command line parameters */
  if ( argc != 5 )
  {
    printf("makeGray fileName.pgm nrows ncols grayLevel\n");
    return 0;
  }

  nrows = atoi( argv[2] );
  if ( nrows < 1 )
  {
    printf("number of rows must be positive\n");
    return 0;
  }

  ncols = atoi( argv[3] );
  if ( nrows < 1 )
  {
    printf("number of columns must be positive\n");
    return 0;
  }

  grayLevel = atoi( argv[4] );
  if ( !(grayLevel >= 0 && grayLevel <=255) )
  {
    printf("grayLevel must be between 0 and 255\n");
    return 0;
  }

  /* open the image file for writing in binary mode (see "gotcha!" in Gray Level Images) */
  if ( (image = fopen( argv[1], "wb") ) == NULL )
  {
    printf("file %s could not be created\n", argv[1]);
    return 0;
  }

  /* write out the PGM Header information */
  fprintf( image, "P5 ");
  fprintf( image, "# Created by makeGray\n");
  fprintf( image, "%d %d %d ", ncols, nrows, 255 );  /* width, height, max gray level */

  /* write out the pixel data */
  .... Your work goes here ....

  /* close the file */
  fclose ( image );

  return 1;
}
Finish the program by adding a few lines. When you are done, click on the answer icon to see a suggested answer.
| |
Use IrfanView to examine the image file that your program creates. You should see something like the above image (except larger). Check that the number of rows and columns displayed are consistent with what was specified.
![]()
Rearrange the previous program so that main() does only
command line processing, file creation, and file closing.
Create a function, called by main(),
that does the specialized work of writing out the pixel data.
The command line will be the same as in the previous program:
C:\PuzzleFolder>makeGray gray240.pgm 200 300 240
It would be sensible (of course) to make a copy of the previous program and rearrange it with your text editor.
![]()
Write a main() program that creates an image that is a gray wedge.
A gray wedge is an image that has a gray level 0 in its first row
and gray level 255 in its last row,
and the rows in between increasing in gray level.
The command line
specifies the size of the image.
C:\PuzzleFolder>grayWedge imageName.pgm nrows ncols
A 200 by 400 gray wedge image is:
 |
Use nearly the same main() as the previous program. Make a few
small changes in the parameters and in the function call. The function writes
the pixels to the image file, similar to the previous program:
void writeWedge( FILE *image, int nrows, int ncols)
The function makes no assumptions about the size of the image. In particular, the image is not assumed to have exactly 256 rows.
![]()
Write a program that creates an image with N vertical bands of gray. The first band is gray level 0 and the last band is gray level 255. The command line specifies the size of the image and number of bands.
C:\PuzzleFolder>grayBands grayBands.pgm nrows ncols bands
For example,
C:\PuzzleFolder>grayBands tenBands.pgm 100 300 10
creates the image:
 |
It is hard to figure out what to do when the number of bands do not evenly divide the number of columns. For example, when the number of bands is 10 and the number of columns is 256. Each band should be 25.6 pixels wide, but of course, this can't be done. Instead, make each band but the last 25 pixels wide, and make the last band as wide as needed to complete the image.
A similar problem is when the number of bands does not evenly divide the number of gray levels. For example, when the number of bands is 10 (and the number of gray levels is 256.) Make each band the same step up from the previous, even though the last band might not be exactly 255.
Here is a main() for use with this program. Your job is to write
the function that it calls:
int main( int argc, char *argv[] )
{
  int nrows, ncols, nbands;
  FILE *image;

  /* check the command line parameters */
  if ( argc != 5 )
  {
    printf("grayBands fileName.pgm nrows ncols nbands\n");
    return 0;
  }

  /* open the image file for writing */
  if ( (image = fopen( argv[1], "wb") ) == NULL )
  {
    printf("file %s could not be created\n", argv[1]);
    return 0;
  }

  nrows = atoi( argv[2] );
  if ( nrows < 1 )
  {
    printf("number of rows must be positive\n");
    return 0;
  }

  ncols = atoi( argv[3] );
  if ( nrows < 1 )
  {
    printf("number of columns must be positive\n");
    return 0;
  }

  /* Get the number of bands */
  nbands = atoi( argv[4] );
  if ( nbands<=0 || nbands>256 )
  {
    printf("Can't create %d bands\n", nbands);
    return 0;
  }

  /* write out the PGM Header information */
  fprintf( image, "P5\n");
  fprintf( image, "# Created by grayBands\n");
  fprintf( image, "%d %d %d\n", ncols, nrows, 255 );

  /* write out the pixels */
  writeBands( image, nrows,ncols, nbands);

  /* close the file */
  fclose ( image );
  return 1;
}
Mach Bands: If you examine the above banded image carefully, it looks as if each band is not quite all the same level of gray. Starting from the left, each band looks like it gets a little bit darker just before the next band. And the next band looks like it starts out a little bit brighter than it should.
This is a result of how your human vision system works. The phenomenon is called Mach bands (named after the same person who brought us "Mach numbers" for expressing supersonic speeds). Your vision system exaggerates changes near edges so that edges stand out. Edges usually convey the most important information in a scene.
![]()
Write a program that creates an image with nAcross by nDown
checkerboard squares. Alternate the squares between level 100 and level 200.
If the number of squares across (or down) does not evenly divide the image size,
pad the image with pixels of level 50.
C:\PuzzleFolder>checkerBoard check.pgm nrows ncols nDown nAcross
For example,
C:\PuzzleFolder>checkerBoard check.pgm 256 256 7 9
creates the image:
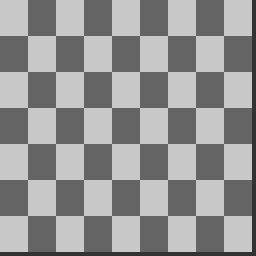 |
In this image, the width of 256 is to be divided into 9 squares. So each square is 256/9 = 28 pixels across. But 28 * 9 = 252 so there are 4 pixels of padding at the right of the image. A similar calculation for the rows results in 4 pixels of padding at the bottom.
Here is the main() file for your program:
int main( int argc, char *argv[] )
{
  int nrows, ncols ;
  int numAcross, numDown;

  FILE *image;

  /* check the command line parameters */
  if ( argc != 6 )
  {
    printf("checker fileName.pgm nrows ncols  squaresDown squaresAcross\n");
    return 0;
  }

  nrows = atoi( argv[2] );
  if ( nrows < 1 )
  {
    printf("number of rows must be positive\n");
    exit( EXIT_FAILURE );
  }

  ncols = atoi( argv[3] );
  if ( nrows < 1 )
  {
    printf("number of columns must be positive\n");
    exit( EXIT_FAILURE );
  }

  /* open the image file for writing */
  if ( (image = fopen( argv[1], "wb") ) == NULL )
  {
    printf("file %s could not be created\n", argv[1] );
    exit( EXIT_FAILURE );
  }

  /* write out the PGM Header information */
  fprintf( image, "P5\n");
  fprintf( image, "# Created by makeChecker\n");

  /* width, height, number of gray levels */
  fprintf( image, "%d %d %d\n", ncols, nrows, 255 );

  /* Get the number of squares down */
  numDown = atoi( argv[4] );
  if ( numDown<=0 || numDown>nrows )
  {
    printf("Can't create %d squares in %d rows\n",
      numDown, nrows );
    return 0;
  }

  /* Get the number of squares across */
  numAcross = atoi( argv[5] );
  if ( numAcross<=0 || numAcross>ncols )
  {
    printf("Can't create %d squares in %d columns\n",
      numAcross, ncols );
    return 0;
  }

  /* Create the Image */
  makeChecker(image, nrows, ncols, numDown, numAcross);

  /* close the file */
  fclose ( image );
  return 1;
}
![]()
Make an image where the gray level of each pixel depends on how far it is from the top left corner of the image. Make the top left of the image gray level 255. Make the rest of the pixels
255 * (1.0 - distFromTopLeft/diagonalLength)
where the diagonalLength is the length of the diagonal from the
top left corner of the image to the bottom right corner of the image, and distFromTopLeft
is the distance the pixel is from the top left. Use floating point arithmetic,
but cast the result to an int.
The diagonalLength is calculated with the Pythagorean formula:
( nrows2 + ncols2 )(1/2)
The distFromTopLeft for a pixel at row, col is calculated as:
( row2 + col2 )(1/2)
For example,
C:\PuzzleFolder>distImage dist.pgm 300 500
creates the image:
 |
A variation on this is to base the gray level of each pixel on the ratio of the square of its distance from the corner over the square of the diagonal length:
255 * ( 1.0 - distFromTopLeft2/diagonalLength2 )
In doing this you avoid the need for the square root function. But you get a different image.
![]()
Make an image where the gray level of each pixel depends on how far it is from the center of the image. Make the center gray level 255. Make the rest of the pixels
255 * (1.0 - distFromCenter/halfDiagonalLength)
where the halfDiagonalLength is half the length of the diagonal
from the top left corner of the image to the bottom right corner of the image,
and distFromCenter is the distance the pixel is from the top left.
Use floating point arithmetic, but cast the result to an int.
For example,
C:\PuzzleFolder>distCenter distCenter.pgm 300 300
creates the image:
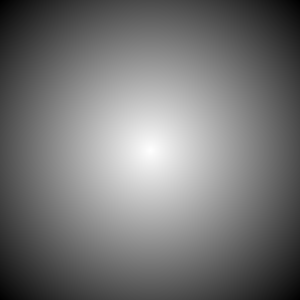 |
This program can be created by modifying the previous one. Play with other ways to calculate pixel gray level if you want. For example, you might want to make the gray level proportional to the cosine of (pi/2)*(distFromCenter/halfDiagonalLength)
![]()
Write a program that creates an image with a filled circle placed
in the center. Make pixels on the inside of the circle value 200 and those outside
the cirlce value 50. Find the largest dimension of the image and make the radius
of the circle one third that value.
For example,
C:\PuzzleFolder>circle circle.pgm 300 400
creates the image:
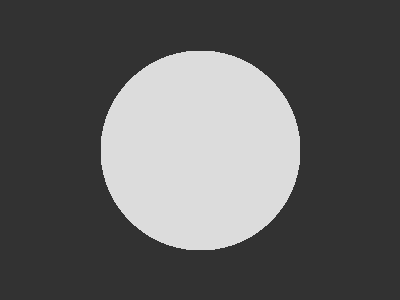 |
This program can be created by modifying the previous program. To determine if a pixel is inside or outside of the circle, check if its distance from the center is less than the radius of the circle.
![]()
Write a program that creates an image with a circle placed in
the center. The circle is given a checkerboard texture. Find the largest dimension
of the image and make the radius of the circle one third that value. Make the
sides of the squares of the checkerboard 1/16 the largest dimension of the image.
Make the background a checkerboard with squares 1/12 the largest dimension of the image. Pick pleasing gray levels for the squares.
For example,
C:\PuzzleFolder>circleChecks circleCheck.pgm 300 400
creates the image:
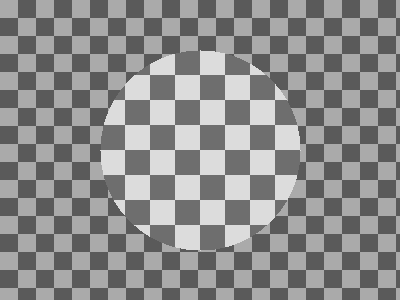 |
This program can be created by combining the two previous programs.
![]()
Create an image that has horizontal ripples that look like a washerboard. The number of ripples is a parameter of the command line.
Ripples are made by calculating the gray level of a pixel in row r to be:
level = 127 + 127*cos( 2N*π*r/nrows )
The cos function varies between -1 and +1. When it is -1, the above expression
reduces to 127-127, or 0. When the cos is +1, the above expression reduces to
127+127, or 254. The cos goes through one complete cycle in 2π
radians. To get N complete cycles, we need 2Nπ radians. These
are spread out over over nrows. A pixel at row n is
at 2N*π(n/nrows) radians.
For example,
C:\PuzzleFolder>washerboard washerboard.pgm 400 400 12
creates the image:
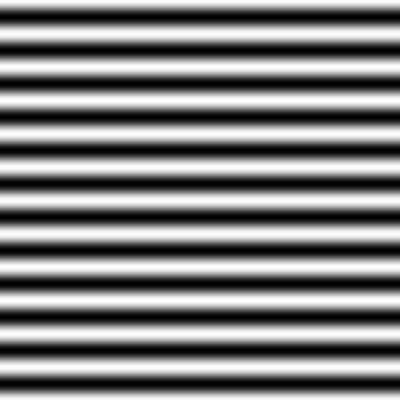 |
The definition of pi, M_PI, is found in math.h. Not all C environments
support this. You may have to inspect your compiler options if it complains
about this constant.
![]()
 — Return to the main contents page